What happens after checkout

  1. Step 1

    Start printing

    Files are available immediately while your kit ships.

  2. Step 2

    Follow the guide

    Print the parts, solder the simple crossover and screw the speakers together, step by step.

  3. Step 3

    Listen to your build

    Connect to your desktop or stereo amplifier and enjoy a pair of speakers you built yourself.

Supersonic Mk3 Kit

Supersonic Mk3 Kit

Builds a pair of compact desktop speakers

Build a proper pair of desktop speakers with your 3D printer. Simple crossover, straightforward assembly and a compact cabinet designed for nearfield listening.

Regular price $199.00 AUD
Regular price Sale price $199.00 AUD

Free shipping

Quantity

Quick fit check

Difficulty
Beginner
Print time
~20 hours per speaker
Printer size
W 140 x D 170 x H 130 mm
Filament
~1.6-1.7 kg PLA for the pair
Amp
Any 4-ohm-compatible desktop amplifier
Shipping
Free worldwide shipping included

What's in this kit

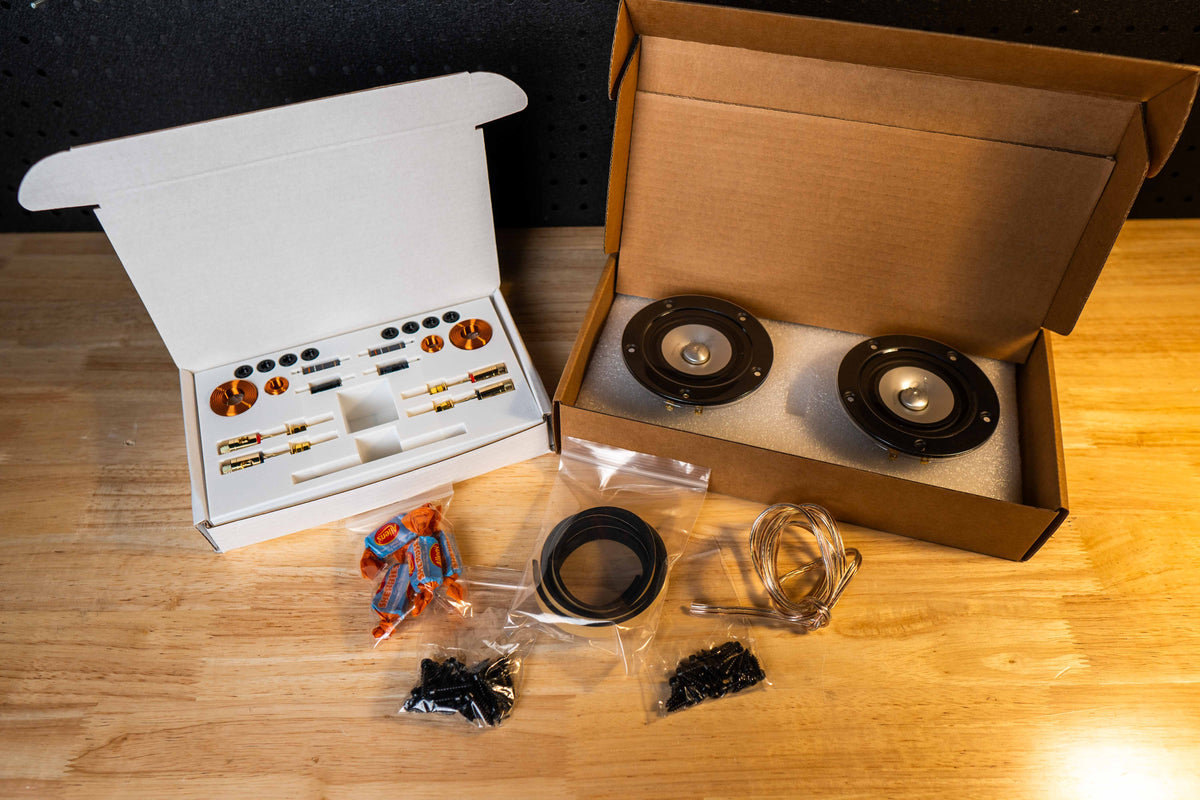
Includes print files, full guides, two Markaudio drivers, Jantzen crossover parts, wire, damping, gaskets, screws, feet and binding posts.

Included guides

Open the full PDFs before you buy.

View full details

Full guides included

Print settings, simple crossover, assembly and wiring

Markaudio drivers

One 3-inch CHN-50 full-range driver per speaker

Email support

Help if you get stuck

Free worldwide shipping

Included with every kit

The project

Small speakers. Proper DIY.

The Supersonic Mk3 brings Markaudio drivers, an upgraded crossover and a redesigned rear port to a simple desktop speaker build. Clear instructions and a screw-together cabinet make it easy to get started, and easy to get back inside later.

Build type
Passive full-range desktop speaker pair
Best for
Desktops, small workspaces and a first speaker build
Skill level
Beginner
End result
A finished pair of compact desktop speakers for your external amplifier
No woodworking, crossover design or permanent cabinet glue joints. Print the parts, follow the guide and screw it together.
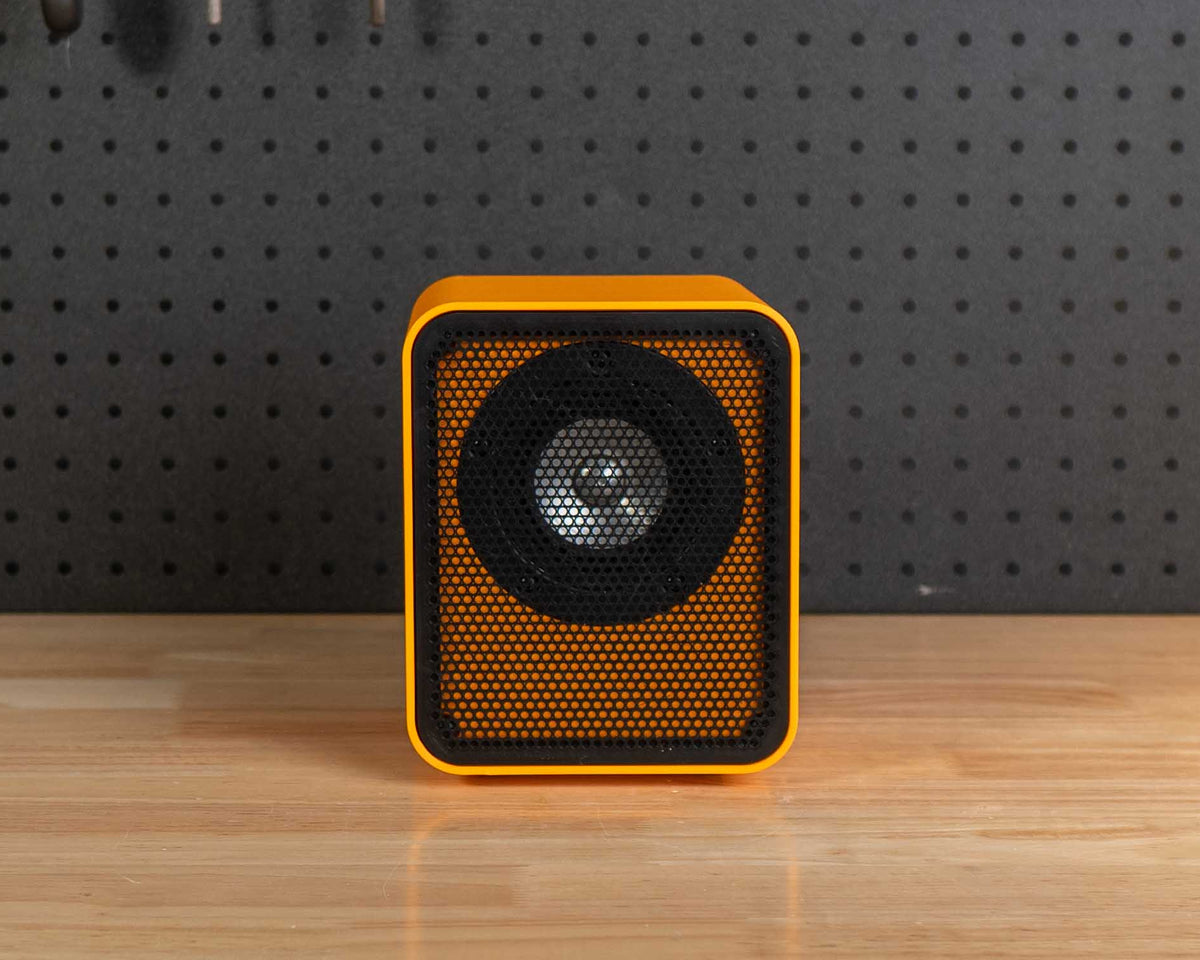
A small square speaker with a yellow-orange frame and black grille sits centered on a wooden workbench in a workshop setting with a black pegboard and tools behind it.

Fit check

Is this the right kit for you?

Check the printer size, build time and basic skills before you start.

Skill level

Beginner

A straightforward first speaker build with basic soldering and clear instructions.

Printer size

W 140 x D 170 x H 130 mm

Minimum build volume for the supplied STLs.

Print time

~20 hours per speaker

Based on a typical CoreXY printer using the included settings.

Build time

Around two afternoons for the pair

Hands-on assembly time, excluding printing and optional finishing.

Printing
Easy
Support-free FDM printing in PLA, with parts supplied in their intended print orientation.
Soldering
Beginner-friendly
Four crossover components per speaker, with a labelled board and step-by-step wiring instructions.
Assembly
Simple
Apply the gasket tape, fit the parts and screw on the baffle. No cabinet glue-up or clamping.

Use case

Where this kit makes sense

A compact DIY speaker for desks, smaller rooms and first-time builders.

Best for

  • Desktop music and everyday listening
  • First-time speaker builders
  • Builders with smaller 3D printers
  • Anyone who wants a speaker they can open, modify and repair
  • Small rooms and workspaces

Probably not for

  • Deep bass without a subwoofer
  • Large rooms at high listening levels
  • Anyone looking for a ready-made, plug-and-play speaker
  • Builds where soldering or an external amplifier are a deal-breaker
Soldering
Required
Basic soldering only. The four-component crossover uses a labelled PCB, with clear wiring steps in the guide.
Finishing
Optional
Use the parts straight from the printer or finish them however you like. The cabinet screws together, so there are no permanent glued cabinet joints.

Kit contents

Everything for the speaker. You print the cabinet.

The kit takes care of the parts that are harder to source individually. You get the Markaudio drivers, crossover components, wiring, damping, hardware and full build guides for a pair of Supersonic Mk3s. Print the cabinet parts at home, then put everything together following the guide.

Included

Included in the kit

The files, parts and hardware supplied with this kit.

THE SPEAKER PARTS

Two Markaudio CHN-50 drivers, Jantzen crossover components, internal wiring, binding posts, damping, gasket tape and all the mounting hardware for the pair.

THE FILES

Print files for the cabinets, grilles, crossover boards and small assembly tools.

THE GUIDES

A complete step-by-step build guide, print settings, wiring instructions and dimensioned specifications.

Supply yourself

What you bring

A 3D printer, PLA, basic hand tools, a soldering iron and a suitable 4-ohm amplifier.

Printer and filament

A reliable FDM printer with at least W 140 × D 170 × H 130 mm build volume, plus around 1.6–1.7 kg of PLA for the pair. The parts are designed to print without supports.

Basic tools

A soldering iron, hot glue gun and a few common hand tools are all you need. Nothing specialised or workshop-heavy.

WANT MORE BASS?

Pair them with the Subsonic Mk3 and a suitable 2.1 amplifier.

Build path

How the project comes together

Print the parts, build the simple crossover, fit the hardware and screw it together. The removable baffle means the build does not have to be the last time you look inside.

Step 1

Print the parts

Use the included files and print settings.

Step 2

Build the crossover

Assemble the simple crossover with the guide.

Step 3

Fit the internal parts

Fit the internal parts using the assembly guide.

Step 4

Screw it together

The cabinet screws together, with no glue-up or clamping.

Step 5

Connect and listen

Connect to your amplifier and enjoy your build.

Guides

See the full guides before you build

Read the assembly guide and spec sheet before you start printing.

Screenshot of the Supersonic Mk3 assembly guide

Build guide Preview the guide. Open the PDF for the full document. See the full build guide

Build guide

Print settings, kit checklist, simple crossover wiring, screw-together assembly and troubleshooting.

Spec sheet

Dimensions, Markaudio driver, impedance, bass extension and measurements with and without the grille.

Sound

What changed for the Mk3

New Markaudio drivers, an upgraded crossover, a redesigned rear port and a cabinet that comes apart with screws, not a saw.

Supersonic Mk3 desktop speaker showing its printed enclosure, front baffle and Markaudio driver design annotation 1 3 4
1

Markaudio full-range driver

One 3-inch CHN-50 driver in each speaker, keeping the desktop build compact and straightforward.

2

Upgraded crossover

Four Jantzen components per speaker, fitted to a labelled printed board with clear soldering instructions.

3

Redesigned rear port

A revised rear port for the Mk3 bass-reflex enclosure, with the finished speaker’s bass response shown in the spec sheet.

4

Screws, not permanent glue joints

The baffle seals against gasket tape and screws into place. Remove the baffle screws to get back inside for repairs or modifications.

Measurements

Measured, so you're not guessing

Frequency response, impedance and directivity measurements show how the finished Supersonic Mk3 behaves.

Measured on the finished speaker, with frequency response and directivity shown both with the grille.

  • Response with grille
  • 4-ohm nominal impedance
  • Horizontal and vertical directivity
Frequency response measurements for Supersonic Mk3 with and without the grille

Frequency response

The tonal balance of the finished speaker, measured with the grille.

View full measurement
Impedance and phase measurement for Supersonic Mk3

Impedance

The electrical load presented to your amplifier. Supersonic Mk3 is rated at 4 ohms nominal.

View full measurement
Horizontal and vertical directivity measurements for Supersonic Mk3

Directivity

How the sound changes away from the front of the speaker, horizontally and vertically.

View full measurement

Specs

Technical specifications

The practical details: print size, materials, driver, amplifier requirements and what you will build.

Key specs

Type
Passive full-range desktop speakers pair
Printer size
W 140 x D 170 x H 130 mm
Filament
~1.6-1.7 kg PLA for the pair
Print time
~20 hours per speaker
Amplifier
Any 4-ohm-compatible desktop amplifier
Impedance
4 ohms nominal
Low-frequency extension
100 Hz (-3 dB), 55 Hz (-10 dB)
Cabinet and print details
Enclosure
Rear-ported bass reflex
Cabinet assembly
Screw-on baffle with gasket tape; no glued cabinet joints
Print material
PLA
Printer size
W 140 x D 170 x H 130 mm minimum build volume
Filament
0.8-0.85 kg per speaker; ~1.6-1.7 kg for the pair
Print supports
Not required in the supplied print orientation
Dimensions (H x W x D)
170 x 140 x 127.5 mm per speaker
Finished speaker weight
1.3 kg per speaker
Grille
3D-printed, press-fit
Driver and amplifier
Driver
1 x Markaudio CHN-50 3-inch full-range driver per speaker
Crossover
Upgraded passive crossover with four Jantzen components per speaker
Crossover components
15 µF capacitor, 0.35 mH and 0.05 mH inductors, 3.9-ohm resistor per speaker
Impedance
4 ohms nominal
Input
Speaker-level binding posts
Amplifier required
Desktop or stereo amplifier suitable for 4-ohm speakers; a 2.1-channel model with an amplified subwoofer output powers the complete Supersonic and Subsonic setup. Amplifier not included.
Performance
Sensitivity
84 dB, 1 W / 1 m
Low-frequency extension
100 Hz (-3 dB), 55 Hz (-10 dB)
Max SPL
90 dB @ 1 m, single speaker
Files and support
Printable files
Enclosure, baffle, grille, crossover board and binding-post tool
Print preparation
Parts supplied in their recommended print orientation
Guides
Illustrated assembly guide with print settings, wiring and troubleshooting; spec sheet with measurements
Support
Build help by email or by joining our Discord

Compare

Which speaker kit suits your space?

Compare the compact desktop, bookshelf and centre channel options.

Model Best for Size Bass Difficulty
Supersonic Mk3 This one Desktops, small workspaces and a simple first build Compact desktop pair Use on their own, or pair with the matching Subsonic Mk3 for deeper bass Beginner
Emanate 4 Desktops, bookshelves, small rooms, surrounds, or pairing with a subwoofer Compact bookshelf pair Useful on its own, better with a subwoofer Beginner
Emanate 6 Larger rooms, fuller sound and main left/right speakers Larger bookshelf pair Deeper and fuller than Emanate 4 Beginner
Emanate 4C Home theatre center channel Single compact centre channel Intended to be used with a subwoofer Beginner to intermediate

Support

Help if you get stuck

If something is missing, damaged or unclear, email support is included.
  • Missing or damaged kit parts are replaced.
  • Build help is available by email or on our Discord.
  • Setup questions are welcome.
  • Custom design changes are not included.

Questions

Before you start printing

Quick answers before you commit to the build.

Question What changed for the Mk3?
The Mk3 uses Markaudio CHN-50 drivers, an upgraded crossover and a redesigned rear port. The cabinet now screws together over gasket tape, so you can remove the baffle to access the parts inside.
Question Will this fit my 3D printer?
The minimum build volume is W 140 x D 170 x H 130 mm. Parts are supplied in their recommended orientation and are designed to print without supports.
Question Is this a good first speaker build?
Yes. The Supersonic Mk3 is a beginner build with one driver and a simple four-component crossover per speaker. Clear instructions take you through printing, soldering and assembly.
Question Do I need to know how to solder?
You do need to solder, but this is a straightforward project to learn on. The crossover board is labelled, and the guide shows the component connections and speaker wiring step by step.
Question Is the assembly glue-free?
The cabinet assembly is. The baffle screws onto gasket tape, so there are no permanent glued cabinet joints. Hot glue is still used to secure crossover components and damping inside the speaker.
Question Can I take the speakers apart later?
Yes. Remove the press-fit grille and undo the baffle screws to get back inside. You can access the driver, crossover, wiring and damping without cutting open the enclosure. Custom design changes are not included in build support.
Question Do I need a subwoofer?
The Supersonics can be used on their own, but they’re designed to pair with the Subsonic Mk3 for a fuller desktop setup. The matching passive 6.5-inch subwoofer adds the deeper bass while keeping the speakers on your desk compact. Build both together, or start with the Supersonics and add the Subsonic later. The Supersonics’ published bass extension is 100 Hz at -3 dB and 55 Hz at -10 dB.
Question Do I need woodworking tools?
No. The cabinet is 3D printed and screws together with common tools. No cutting timber, cabinet glue-up or clamping is required.
Question What amplifier should I use?
For the complete Supersonic and Subsonic setup, use a 2.1-channel desktop amplifier with an amplified output for a passive subwoofer, such as the Fosi BT30D PRO. One amplifier powers both Supersonics and the Subsonic. Connect the Supersonics to the left and right speaker outputs, and the Subsonic to the amplified subwoofer output. An RCA socket labelled “sub out” alone won’t power a passive subwoofer. Using just the Supersonics? A desktop or stereo amplifier suitable for 4-ohm speakers is all you need. The amplifier and speaker cable are not included.


THE DESKTOP SYSTEM

Two speakers. One sub. One amp.

Build a complete 2.1 desktop system with the Supersonic Mk3 and matching Subsonic Mk3 subwoofer. Enjoy compact speakers and deeper bass, all powered by one small 2.1 amplifier such as the Fosi BT30D PRO.

This kit builds the Supersonic speaker pair. The Subsonic Mk3 and amplifier are not included. Build both together, or start with the Supersonics and add the Subsonic later.

Finished Supersonic Mk3 desktop speaker with its printed grille fitted

Ready when you are

Ready to build the Supersonic Mk3?

You can build this.

Print the parts, solder the simple crossover and screw it together. Build a pair of compact desktop speakers you can enjoy every day, and open up again when the next idea comes along.

Digital files are emailed after checkout. In-stock kits ship within one business day.